

Scrivener vs. Word
Scrivener vs. Word
Part 1: Anything you can do...


If you’re a writer, no matter your genre or your level of expertise, you’ve probably heard of Scrivener. Some writers love it, but others have a love/hate relationship with it. Maybe that’s because learning everything it can do can seem overwhelming. In this two-part series, we examine Scrivener’s best and most notable features and then see if we can replicate them in Word.
Scrivener, created by Literature and Latte, is one of the most comprehensive programs made exclusively for writers. It’s more than word-processing software—think of it as a digital desk. It organizes your notes, research, and media files, in addition to having a word processor front-and-center. The built-in templates and layouts keep the writer’s most important information and tools in plain view. However, some users find Scrivener confusing or overengineered, with just enough good things to outweigh the bad.
Scrivener overview:
(Note: I use Scrivener 3 for Windows for this article)
Most writing software opens documents; Scrivener opens projects. A project is everything you collect or create for your novel, essay, article, or script. Scrivener organizes your project’s information in one of three different areas: The Binder, the Inspector, or the Editor.
The Binder: The Binder is on the left-hand side of the screen. It is a file tree with all your documents and resources. It holds your manuscript, research, character bios, and old drafts. If you feel a scene or a chapter is out of place, you can easily move it where you want it to be in the binder. Everything is drag-and-drop.
The Inspector Panel: This panel will open on the right side of your screen. As the name suggests, this panel lets you peer into the finer details of your document. Set up and view metadata, apply tags, or display general information. Mine is set up so that a copy of the scene card is at the top and a notepad is at the bottom.
The Editor: The Editor Window is in the center of your screen. You can switch between Document View, Outline View, and Corkboard View (described in the next section). The Editor Window’s best feature, however, is the split-screen option, which allows you to view two documents simultaneously.

The Editor Window
Document View: When you imagine a word processor, you think about Document View. You will do all your writing here. At the top are buttons to change the font, alignment, and formatting options. At the bottom, there is a word counter and a zoom feature.
Outline View: Scrivener lets you assign a lot of information called metadata to documents. Much of this is too detailed for Scrivener to display in the Binder. This is where Outline View comes in handy. You can view the contents of any folder as well as the metadata you have applied to each of its documents. This can help you keep track of drafts, interview transcriptions, or virtually anything you want.
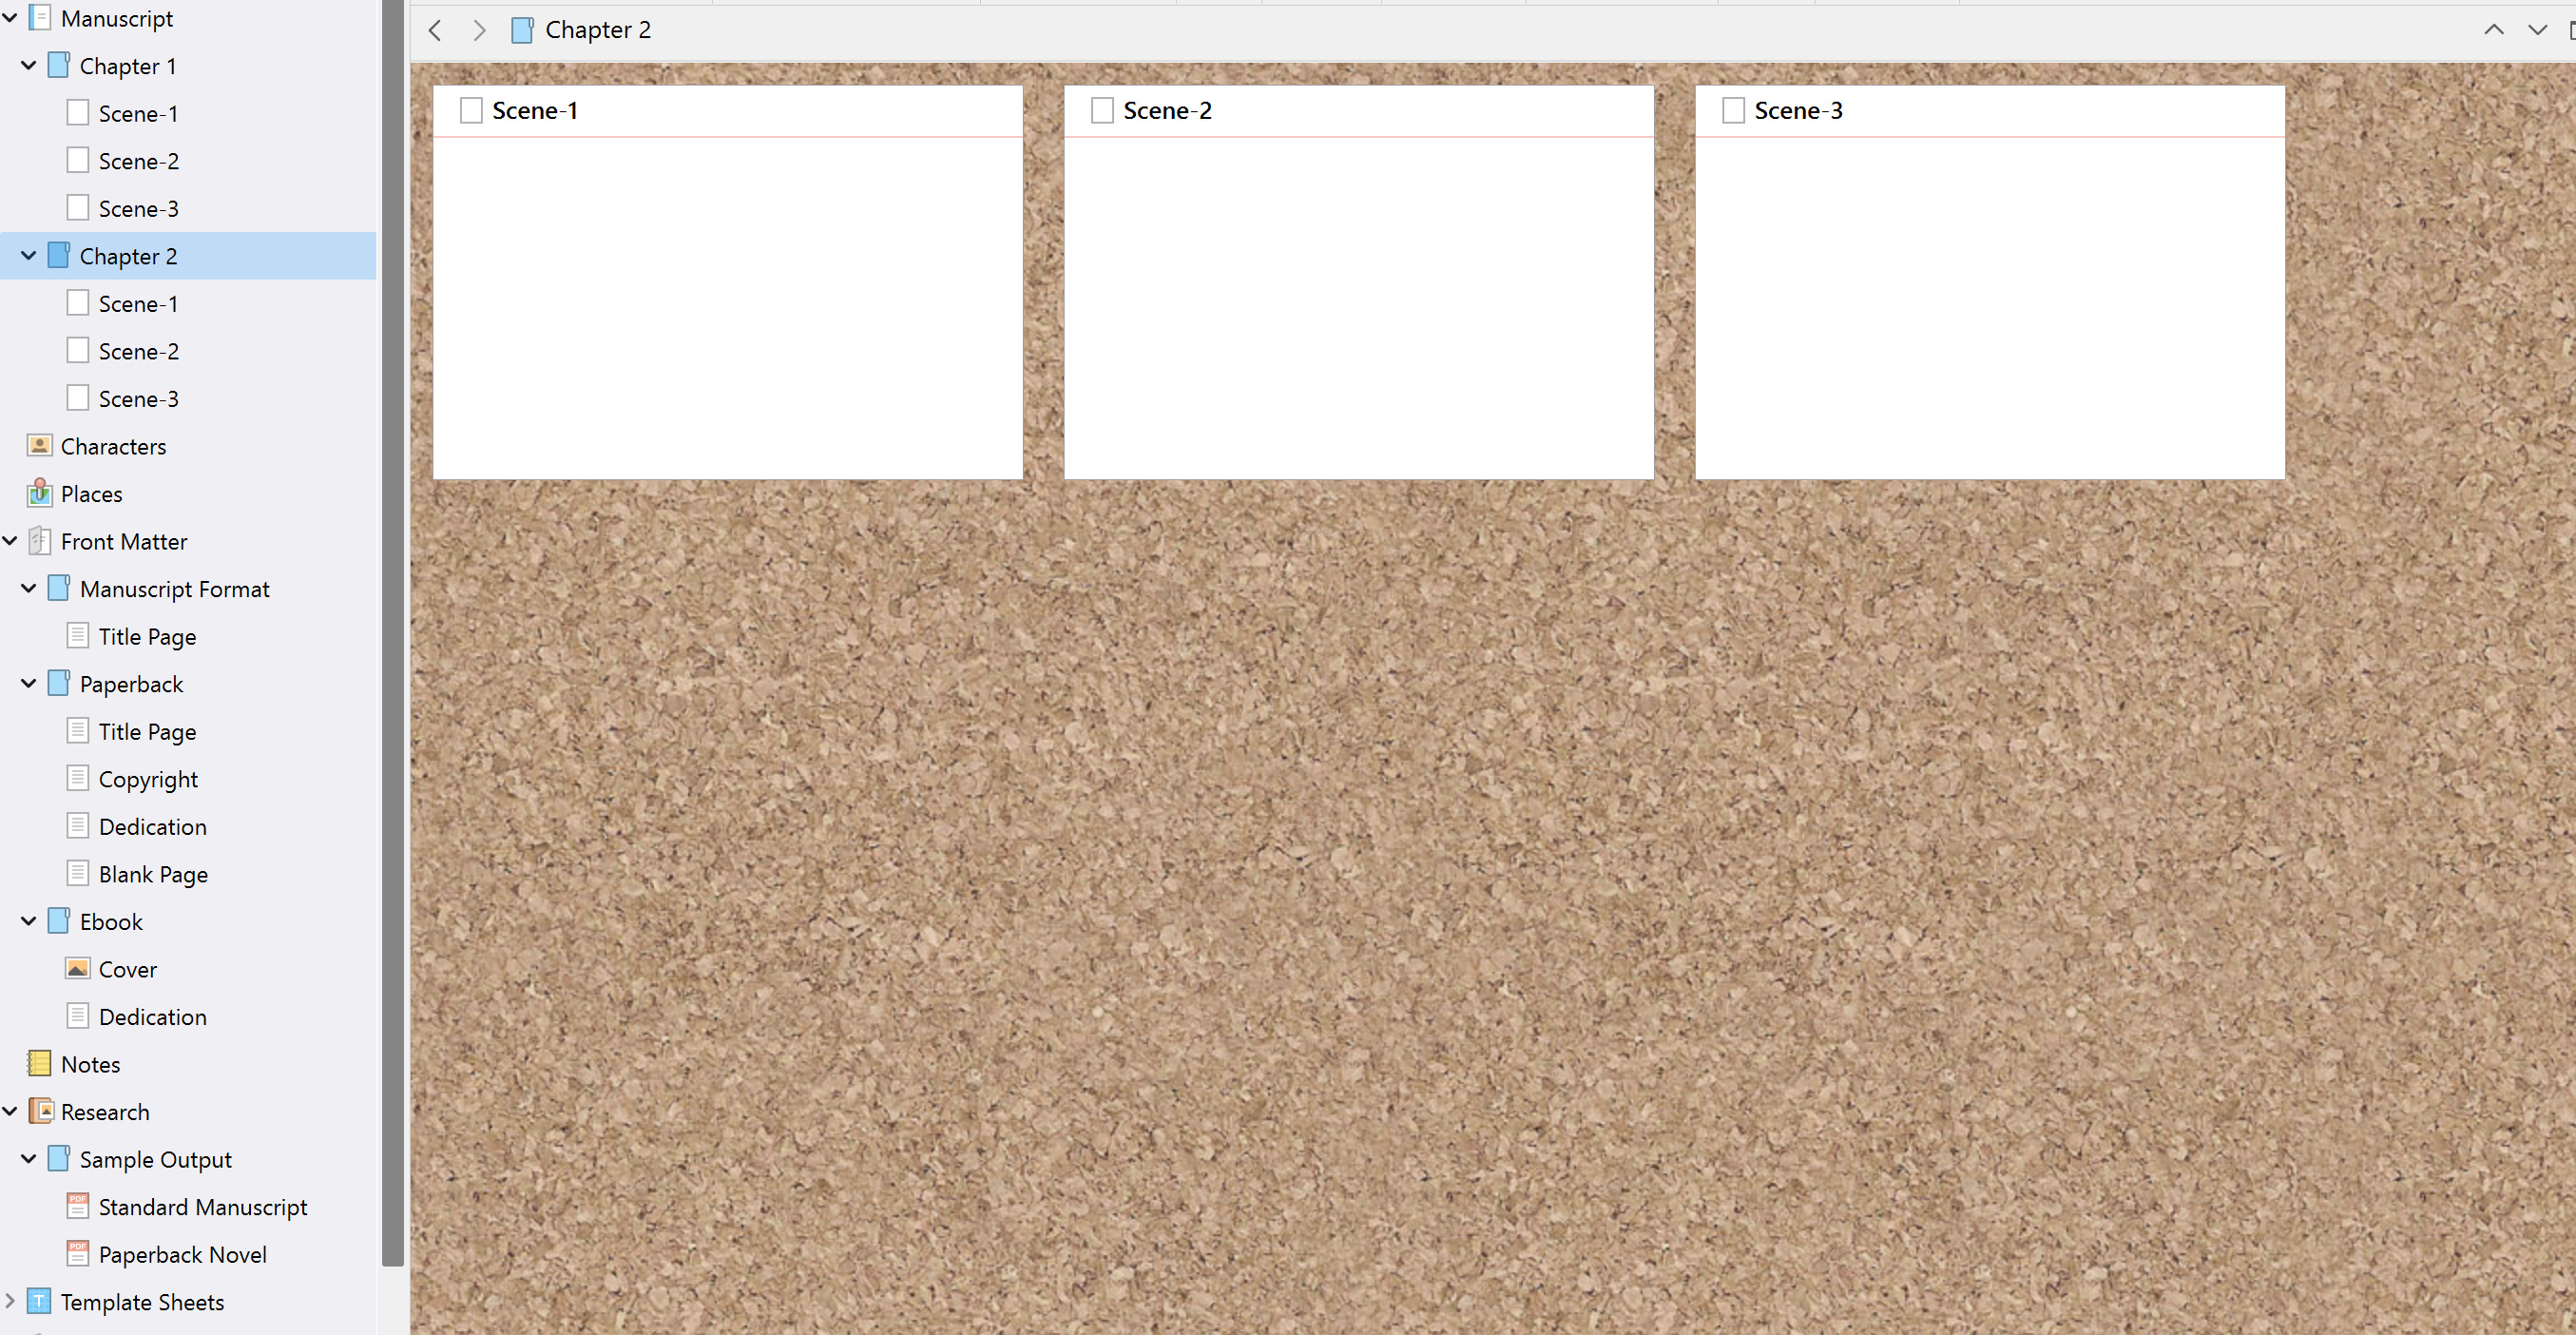
Corkboard View: In one of its most iconic features, Scrivener emulates the look and feel of using corkboard and index cards to organize scenes. You can drag and drop scenes into their best order. Scrivener lets you organize your writing exactly like you would by hand. This is linked to the binder so that all changes will also show there.
Scrivener’s best-known features:
Each of the following features includes instructions on how to find them from one of the ten menu options at the top of your screen.
The Compiler (File → Compile)
The compiler will export everything in your Manuscript folder into one of several packages. You can choose from standard manuscript format, e-book, or custom layout. It will adjust the font, margins, and headers automatically. Whether you’re sending your documents to a publisher or you are self-publishing digitally the Compiler most likely has the format you need.
Composition mode (View → Composition Mode)
Composition mode puts Scrivener in fullscreen with a black background and white text. This removes background distractions and lets you focus on just your text. A slider at the bottom of the screen lets you control the amount of blackout in the background, just in case you need a peek at your notes.
Word counts, targets, and progress trackers (Project → Project targets)
Scrivener offers many ways to see your word count, adjust your writing goals, and monitor your progress. You can set daily word count goals to keep you motivated. You can also set targets for specific documents and the entire manuscript. Numerical trackers and progress bars are at the top and bottom of the screen. There are separate trackers for document and manuscript progress. (This is a handy feature for NaNoWriMo participants.)
Scrivener’s underrated features
Split view ( View → Editor layout)
Split view lets you open two files at once in the Editor window. These can be different files or even different views(e.g., Corkboard View on one side and Document View on the other). Windows can appear side-by-side or above/below each other.
Dialogue focus ( Edit → Writing Tools → Dialogue Focus)
Dialogue focus lets you see your characters’ conversations by fading out any text that’s not between quotation marks. This is a valuable tool for anyone working on improving their dialogue writing skills. I use it to see if it is still clear who is speaking without the attributions.
Speaking mode (Edit → Speech → Start Speaking)
Reading your writing out loud is important, but if there are other people around it may not be possible. Scrivener’s Speaking mode reads your document out loud to you through your computer speakers or headphones. If your writing sounds awkward when spoken out loud it probably reads the same.
Typewriter scrolling (View → Text Editing → Typewriter Scrolling
When you type anything longer than a page your cursor is mostly at the bottom of the screen. Typewriter mode keeps the current line of text you’re editing in the middle of the screen. This helps to keep your eyes (and head) in a more ergonomic position.
Project templates (File → Save As Template)
One reason Scrivener appeals to many writers is that it doesn’t focus solely on fiction writers. Nonfiction writers, screenplay writers, and even essay writers can find templates tailored to their projects. If you modify the layout, add or remove features, or otherwise customize a pre-made Scrivener template, you can save it as your own and use it later.
Note: From the File menu, there is a Save As Template option in the lower half of the menu bar. This is different than choosing the Save As… option.
Metadata
Metadata is an umbrella term for any information about a project. Some metadata, like the document creation date, is automatically collected by Scrivener. When you compile a manuscript Scrivener uses metadata about the author to populate front matter and headers. Users can also create custom metadata, and this is absolutely one of Scrivener’s best and least understood features.
Labels and statuses (located at the bottom of the Inspector panel)
Labels are like colored tabs for your binder. You can assign a description to a color and then apply it to your documents. For instance, a blue label could represent any chapter that focuses on Character A, while a red label could represent any chapter focusing on Character B. You can sort by color in the binder and see only the documents with the color you’re interested in.
Similarly, each document can have a status. Statuses are intended to inform you about where your document is in the creation process. I use mine to distinguish drafts from submitted or exported documents. However, like everything else in Scrivner, statuses are customizable. Add, remove, or edit as you see fit.
Custom metadata (button located at the top of the Inspector panel)
This feature lets you design ways to capture almost any information you want about a document. Using keywords, customizable menus and buttons, and sortable lists, you can record anything you think would be important to track. In the picture below, you can see I created custom metadata to evaluate the excitement and importance of a scene to a story.

Scrivener offers writers a place to store and organize entire projects, not just documents. It is highly customizable and has many amazing features. However, the features and the sandbox-style organization may seem clunky or frustrating to users who want a more polished feel. There is a lot to learn and it can take time to set everything up how you like it.
Keep an eye out for Part 2, where we will try to replicate these features in Word and see if Scrivener’s features are truly unique.
Thank you for this post. I recently started using Scrivener bc I was interested in the formatting (I'm currently writing some comic books and a stage play). But every time I read an article about it I learn something new. This time, about Typewriter Level! What a simple idea that changes the interface!
I've used Scrivener for three books and an assortment of other projects. Thank you for the excellent outline of how it works. I like to write in Scrivener, but I do an export to Word for final drafts and complete editing there. The author is right that there are many useful features, and not all will be used. There is also a learning curve, but it's worth the effort.
One thing not mentioned that is important to me is that Scrivener has really excellent support. Not only are there great tutorials and frequent webinars on a variety of topics, but it is quite easy to get individual attention through their support team.